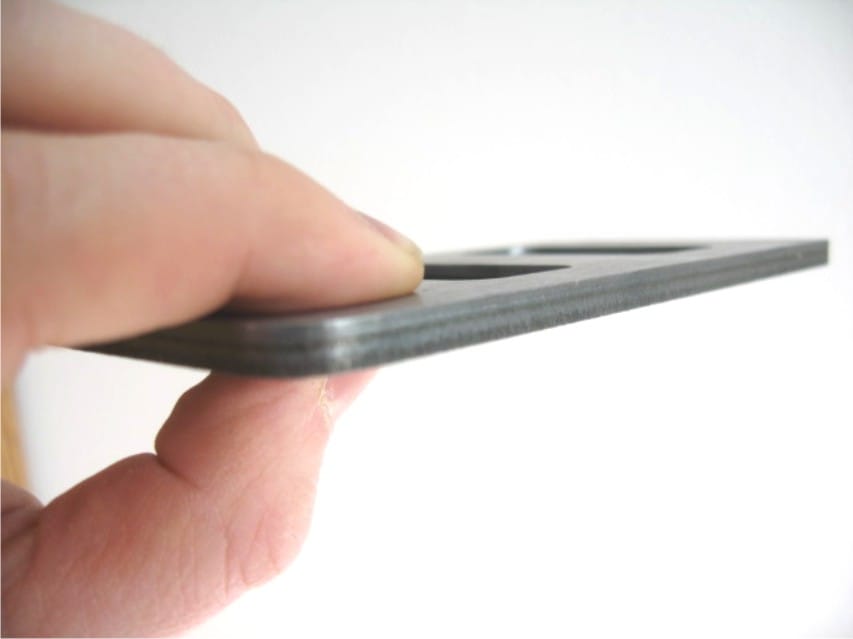
MDF (Medium Density Fiberboard) is a strong, engineered material made of wood fibers, wax, and resin. The ability to laser cut profiles and engrave deep numbers and logos has much money-making potential in the crafting, signage, interior design, and furniture industries.
Laser cutting is an easy way to process shapes with minimal scrap material. A common problem I see from customers who are trying to use their laser to get the most production and the best quality parts comes down to incorrect machine settings. I would like to spend some time and look over all the essential machine settings to get the best results for laser cutting and engraving MDF.
The following 5 parameters are crucial to understand to gain the biggest benefits from your laser system.
POWER
Each Kern laser system is specified by its laser wattage. The actual laser wattage emitted from the laser tube is known as laser power. The higher the wattage, the more power the laser machine has. Every Kern CO2 laser can cut MDF at full 100% power. At this full power setting, you will maximize your machine’s efficiency, or it’s ability to cut out the greatest number of pieces in the shortest amount of time.
Alternatively, you may only be needing to engrave the surface, mark a logo, etch a part number. In these instances, a REDUCED power setting may be best, resulting in a depth and color according to your desired look.
A final consideration with laser power is adjusting the PWM (Pulse Width Modulation). The Kern CO2 laser is a pulsing laser that allows you to adjust the pulsing frequency during the laser process. This frequency range varies from 100 to 50,000 Hz. I have found the peak cutting performance for MDF processing to be in a range from 3800 to 5000Hz. If you increase the pulsing to 10,000 and above the audible noise level will be noticeably quieter, but it will not be in the peak cutting performance range.
SPEED
The goal when cutting MDF is to complete the job in the least amount of time, with the highest quality results. A point of consideration for clean fast cutting is to push the speed as fast as you can and still get completely through the material. One of the problems with cutting too slow is that you will create more dark char or burning on the profile as well as dark smoky spots on the back of the material. This will require your operator to clean the honeycomb bed more often, as well as require a more detailed cleaning of the parts.
When it comes to engraving the MDF, a faster speed will produce more smoke and fumes so be sure the top-side engraving vacuum is enabled and pulling away any lingering smoke from the engraving process.
Sometimes a much lower DPI of the image or artwork will be sufficient when engraving MDF boards and panels. This decrease in picture resolution will allow your overall speed to increase, which will reduce the time it takes to complete the job.
VACUUM
When cutting the MDF material you will notice a good amount of smoke being generated by the lasering process. Most of our machines are equipped with two 2-3 HP blowers, and it is essential to ensure your vacuum system is in operation and running optimally.
One of the import steps when setting up your MDF cutting is to have a powerful suction holding your sheet of material down flat. Since you do not have any clamps to secure or keep the material from bowing up, you will need to be sure to have your vacuum running at full strength as well as sealing off any open area of honeycomb to ensure full vacuum potential.
When engraving with the OPTIFLEX or LASERCELL machines, the top gantry has a vacuum manifold built into the underside of the moving gantry. This manifold is connected to a vacuum unit that assists in the removal of smoke and debris. You will notice when you engrave a piece of MDF the white smoke will rise up into this manifold area and not be deposit back onto the material.
The most misunderstood aspect of cutting this material cleanly is assuring you have your material flat and held down so the nozzle will stay in its proper focus position.
FOCUS
The Kern laser systems have an adjustable tube that allows the movement of the lens assembly into the correct focusing position. Once the lens has been moved to the proper height using a lens spacer tool, the lens assembly has been focused. Now, the part of the beam with the thinnest width can cut the MDF material quickly and cleanly.
If, over time, the material starts to lift up, or the honeycomb table is bent you may notice some wider lines during the cutting process. This is because the distance from the center of your lens to the top of the material has changed and it is no longer in focus.
Several times I have seen where the operator has assumed the lens assembly and the lens spacer tool spacing is correct, but it was not due to the material lifting or the bent honeycomb. Typically, this space is set at the factory so you can quickly place your cutting lens into focus, but in your shop there are other variables that can skew the accuracy of this focusing tool.
The best way to find your focus height is to do a focus test. This focus test can be found in our video library (also shown below) and you only need a a piece of paper or scrap wood. The goal of the focus position it to have the finest or narrowest beam width possible. This may require the operator raising or lowering the internal lens position OR the focus dial slightly to get the lens into the correct focus height.
AIR ASSIST
Finally, another important parameter when cutting this hard fiberboard is to use a good amount of assist air when cutting or engraving. Mounted on the lens assembly, you will find an air elbow. The lens assembly has a ¼” airline that allows for a steady stream of air flowing out the nozzle during the laser process.
The air compressor source will need to have a moisture and oil trap to prevent any contaminants from getting onto your lens. The best pressure to use when cutting MDF will depend on the nozzle size you are cutting with, but I have found the best cutting and engraving pressure with a 0.100″ diameter stock nozzle to be 40 psi.
Kern’s KCAM Laser Software has advanced settings to allow you to piece the material with one air pressure and then cut the profiles with another. The machines have two air gauges that will assist in getting the cleanest entry hole as well as allowing a clean look by pushing and spreading the vaporized MDF away from the kerf path.
If you plan on cutting MDF in the future, be sure to learn and review these five essential parameters to cut your material cleanly, smoothly, and with maximum speeds.