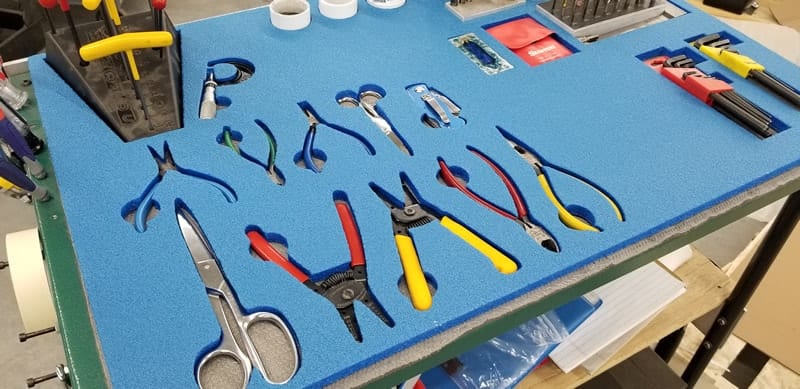
Custom tool kit
We can all agree that a well organized workspace is key to getting the job done quickly and efficiently. Because every profession requires specific tools for the job at hand, it’s important to have them arranged in an order that works best for you.
Today’s tip will show you step-by-step how easy it is to create a custom foam tool kit using your Kern Laser System.
TOOLS NEEDED:
- 1/2″ Tool Foam
- Lightbox
- CorelDraw
- OptiFlex Laser System
- Measuring Tape
- Camera
STEP 1:
Measure the workspace you want to organize the tools within.

STEP 2:
Layout the tools on the surface of the lightbox. Ensure that the tools are kept within the dimensions of your workspace. A buffer zone around the perimeter of the workspace should be considered.
STEP 3:
Using a camera take a centered overhead photo of the entire lightbox extents. Note the dimensions of the lightbox. (In this case, the lightbox is 48” x 24”)

STEP 4:
Import the picture into CorelDraw. Using the Crop Tool, crop the image to the extents of the lightbox. Next, resize the photo to the measurement determined in Step 3 (48” x 24”). This ensures that the tools are sized correctly.
STEP 5:
Using the Trace Bitmap tool, select an outline trace option. For this project, the detailed logo option seemed to result in the best contrast. The PowerTRACE window will now open. Proceed with the following adjustments.
- Click on the Colors tab and select Black and White (see image below).
- Select the Settings Tab and adjust your settings until you are satisfied with the outline of the tool shapes (Detail, Smoothing and Corner Smoothness).
- Select OK.


STEP 6:
Select the new image
- Delete the original bitmap.
- Convert to Curves (Ctrl+Q).
- Left-click the no fill button, and right-click a color to give it a hairline.
- Ensure the line weight is hairline.
- Ungroup all objects (Ctrl+U).

STEP 7:
Clean up the hairlines.
- Use the shape tool (F10) to select individual tools. Review each tool and clean up extra nodes as needed. In this example, we simply deleted the undesired nodes.

Before

After
STEP 8:
For certain tool shapes, like circles and squares, it may be easiest to measure the item and create the general shape to match the size you require. This eliminates the need for cleaning up shapes that can be easily created.


STEP 9:
In this specific project, we added a circle over each tool and used the Weld tool to create an easy access point.

Before: 1.5″ Centered circles over the handles

After Weld
STEP 10:
Laser cut a samples template (optional). To double check your design, laser cut the file into cardboard to ensure the tools are placed where they are desired. Make any adjustments as needed.


STEP 11:
Finally, laser cut the tool foam to create a neatly organized workbench or tool kit!

To order a 52″ x 25″ Light Panel please visit our LaserLocker.com store.


If you have questions about this application or the “how-to” process, please feel free to contact us at info@kernlasers.com.